Obviously the first place you have to start when renovating a cottage is with the foundations. Unless your cottage is built on solid bedrock (envious glance at Connemara cottages…) then chances are you will have to do some structural repairs to the foundations before you begin any renovation work. Needless to say at the outset an engineer is required for this.
The cost of an engineer’s services will be more than paid back in terms of peace of mind and if selling the cottage potential buyers will require the Engineer’s Certification to allay fears. Without that certificate you could be looking at a hefty drop in the price offered as buyers could discount the cost of possible future works.
Now I know there is ancient wisdom out there that says ‘if it’s stood this long, tis grand’ – famous last words. You might be lucky but it’s certainly not a risk that I would take. There are several reasons why you would need to upgrade the foundations:
- The ground may have become unsettled from events like heavy rain, hard frost, new buildings nearby, tree roots growing under the walls and subsidence.
- Extending the cottage, the added load on the walls from extending up or out could cause them to push down and out on the foundation base and walls crumble.
- Lowering the internal floor level to give more ceiling height. Again the base for the stones of the wall is compromised and may cause them to deteriorate.
- Heavy machinery may be used during re-construction and that could cause damage.
- Changing internal walls – opening up walls to give more open spaces could remove essential support structures for the exterior walls.
- Removing the roof to replace with a new roof structure could also compromise the existing support structure.
Types of Foundation Supports or Underpinning
A popular ‘quick and dirty’ method of shoring up foundations is to simply create a low ledge of mass concrete around the periphery of the cottage. As you might imagine – it is not the best looking solution and is definitely not recommended if you are doing major restructural work. I have seen these ledges used as potting plant stands to disguise them.
Traditional Underpinning
This is the process of digging out sections of the ground and foundations external to the cottage and rebuilding the foundations underneath or backfilling with concrete. This effectively rebuilds sections of the foundation in the hopes that those sections will be strong enough to shore up the whole building. It is one of the cheapest methods but can be quite disruptive as you would need at least a mini-digger on site. You need space for this type of underpinning and it is only suitable if the load bearing strata can be found a maximum of 1.5m below the existing foundations.
Jack Pile Underpinning
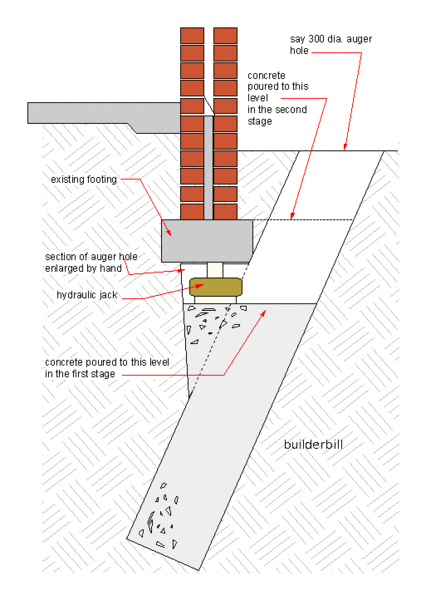
Similar to traditional underpinning this method requires that you dig out sections of the existing foundations and backfill with concrete to reach solid footing. A hydraulic jack is then inserted between the concrete pile and the existing foundations (or walls) and it expands to breach the space between. The steel bars and concrete pile are then installed in this space before the hydraulic jack is removed. This method carries all the same issues as traditional underpinning but you must be sure that the walls are strong enough to span over the heads of the concrete pile caps which are cast onto the jack pile heads after the hydraulic jacks have been removed. It is used for depths deeper than 1.5m.
Mini-Piling & Needle Beams
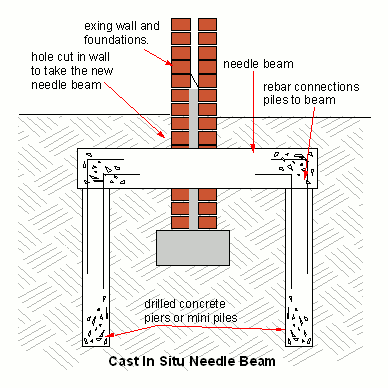
Mini-piling is where a machine drives steel rods known as piles down into the ground to reach the load bearing strata. Small sections are then taken out of the wall and a steel beam known as a needle beam is passed through and connected to the piles on either side of the wall using re-bars. This means that the load of the wall is transferred from the foundations onto the piles.
This method is great for tight spaces as the mini-piling machine can fit into 600mm gaps. Also this method is suitable for high capacity loads the closer together that the piles are placed. The main downside is that it causes a lot of disruption internally if you are already living in the cottage.
Cantilever Needle Beams
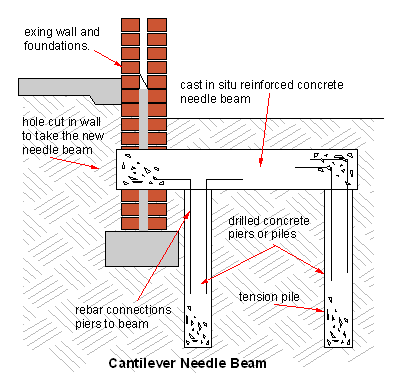
This method is the same as described above except that the needle beam is only supported on one side – usually the outside. There are usually two piles driven on the outside – one for compression (closest to the wall) and one for tension (furthest from the wall). This method is particularly useful if you are living in the cottage and don’t want major disruption or alternatively if you cannot access the external wall of the property. The down side is that you do require slightly more space on the side of the wall that you choose as two piles are driven down – these needle beams can be up to 2 meters long.
Single Pile Cantilever Needle Beam
This does what is says on the tin – it is the same as the cantilever needle beam but with only one pile on one side of the wall – a tension pile. Needless to say it would not carry as heavy a load as the above unless the needle beams are installed quite close together. This would only be used in very tight situations.
Raft Foundation Piling
Where the walls and floors are extremely poor the existing floor is taken out, steel piles are driven down internally to create a raft foundation (a steel cage spanning the entire floor fixed to the steel piles and concrete poured in-situ). The raft foundation is then affixed to the wall using beams so that the weight of the walls rests on the steel piles. If the building has more than one story, precast raft floors can be installed, connected to the walls and will shore up the walls up to 6 floors high. Often these protruding steel beams are made decorative by adding caps on the outside of the wall (seen usually in older mill type buildings).
If you have the space internally it may be an option to take the load completely off the walls and install steel pads on top of the piles to support columns at crucial areas that will support the roof and the entire structure – effectively building an internal ‘skeleton’ for the cottage. This could work out costly but would give you some great room for manoeuvre regards architectural features like floating balconies and walkways etc…
Permeation Grouting
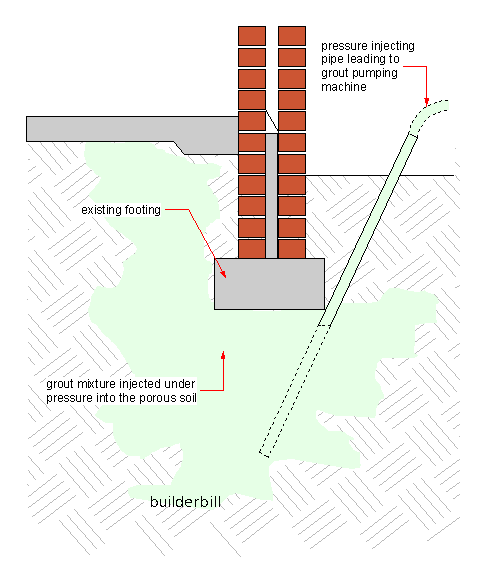
This is where bores are drilled down into the foundation and floors and a liquid or grout is pressure pumped into the ground. The grout fills all voids and spaces underground and makes the ground more solid and closer to solid footing which means that the foundations are more solid. This is a cheaper way to underpin and has been extremely successful, again it is highly useful where the site is difficult to access or has limited space for manoeuvre.
Resin Injection
This is particularly useful for repairing sunken floors. It is similar to permeation grouting in that the resin is pumped into the ground and fills the voids but it also expands removing air and water from the ground. Because it expands it can raise sunken foundations, floors, pathways and roads so it can be a very useful underpinning tool and is space and cost effective.
After all that…
I am sure I have missed out on some forms of underpinning and that you my clever renovators will tell me of your experiences and methods with underpinning and foundations. Even cautionary tales would be great as they will help others along their journey.
Many thanks to BuilderBill for his great illustrations that saved me a whole world of time!

thanks this was a grate help.
Honestly…. I don’t know how to thank you. I have been doing my assignment based on Underpinnings all weekend. But now, I have seen the light! Xoxo
It’s interesting to know that the foundations have to be first considered when renovating a cottage for my new vacation home. I think I would have the contractors use the mini-piling method because it would transfer the load to the piles. Since they are great for tight spaces, I’m sure that the foundation company won’t mind it if they use it for my new home.
I’m in a very old house and I just got a house inspection because I’m hoping to sell it soon. However, the inspector kept mentioning underpinning my foundation and I had no idea what that meant. So thank you for explaining that it means digging in the ground and backfilling with concrete. I’ll have to look into the costs and see about doing that to my house.
I’m renovating a 300 year old thatched cottage in France which has a small section of wall that may benefit from cantilever needle pinning – thanks for this information BB