
The Old Farm Cottage – Before & After Pictures
In 2001, we were on an extended holiday in Ireland, staying in a self-catering cottage in the Midlands. Although we enjoyed doing the typical “touristy” things, we found we were becoming increasingly fascinated with all the abandoned and derelict cottages dotting the countryside, no doubt inspired by the renovated stone coach house that we were staying in!
We decided to search for a derelict stone cottage of our own. We looked in every auctioneers’ window we passed and spent hours searching the internet. One day, we stopped into a real estate office to seek information on a cut-stone cottage. They were about to close for lunch, so we quickly grabbed a selling sheet on this cottage, as well as another on another cottage being offered, and headed out.
The cut-stone cottage was unsuitable – in a bog with no views. As we followed the directions to the other cottage, we were already sold before we arrived – the hillside views were stunning! And the cottage – derelict, yes, but otherwise just what we were looking for: not too big, well-sited on a ½ acre lot surrounded by grazing fields, great vistas, in other words …..PERFECT for us!
Babes Room
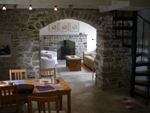
The cottage was built in the 1770’s as a farm worker’s thatched cottage. After a fire destroyed the thatch roof, a second storey and a slate roof were added, probably in the 1860’s. The cottage was lived-in until the 1960’s and then lay derelict until we found it in 2001.
Although the slate roof on the cottage was still in excellent condition, the stone work was in desperate need of re-pointing and all the out-building were built into the hillside, so underpinning was essential once the earth had been moved away from the walls. And, typical of old cottages, the ground level ceiling was low. This problem was solved by digging out the old floor and digging down an extra bit. This allowed us to achieve 2 things: gain more headroom and install under-floor heating.
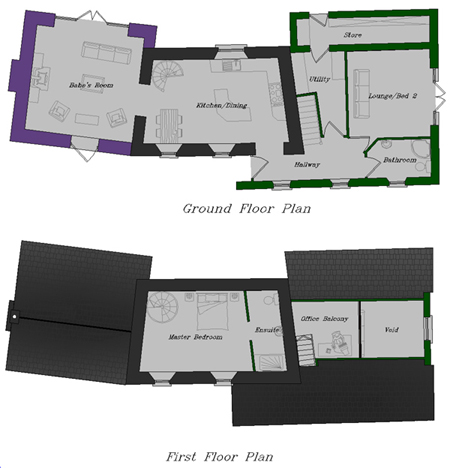
Floor Plans
We completed the renovation over a period of 5 years (summers only). (For the first 2 years, we lived in a 4.5m caravan that we kept on-site. We bought a pre-fabricated shed that we installed very near the caravan and in that we had all the mod/cons: shower and toilet, fridge, microwave, washer, dryer.)
There were 3 parts to the renovation:
- remove several crumbling outbuildings replace with a wood-framed new build, clad wood structure in stone, add slate roof, install doors and windows and finish the interior;
- in the main cottage – re-point the stonework, replace all doors and windows and refinish the interior;
- and in Babe’s Room (the former pig shed) – repair and re-point stone walls, replace rotting tin roof with a slate roof, install doors and windows and refinish the interior.
We did the renovation on a very limited budget. Neither of us had any practical experience in renovating (my husband is a retired banker and I am a retired marketing executive). The key skills we brought to the party were: learning, management, negotiation, problem-solving as well as basic carpentry, wall boarding, plastering, wiring, and painting. We acted as general contractor and go-fer; for all the specialized jobs – re-pointing, framing, roofing and slating – we hired experts.
Original Window Openings
One way we achieved huge savings was sourcing some of the building materials from our home country – Canada. Even with the cost of transportation and the VAT, we still saved an estimated 30%+ vs local sourcing. We rather stumbled on this solution as it came out of our frustration during our first year when we spent excessive amounts of time searching in the local shops for the materials we wanted, only to find they didn’t carry it or it was out of stock at the moment. (Our neighbours quickly learned that our garage was, in fact, a well-stocked “hardware store” and availed of it on several occasions!)
Looking back over the project, we think the following contributed to our happy outcome:
- Homework. We read up on restoring old stone cottages, so we learned about the importance of using lime, recycling building materials, etc,
- Network. We networked to find the trades we used. Our county planner linked us to our architect, our architect linked us to our stonemasons, our stonemasons linked us to our carpenter, etc.
- Treat people well. We “watered and fed” our trades people. We paid them weekly.
- Patience. Things always take longer than expected. (And cost more.)
- Trust yourself. There were several times when “the experts” strongly recommended one course of action and we wanted something different. When we stood our ground we ended up being very happy with the result. When we backed down, we ultimately regretted the outcome.
And finally – the question: would we do it again? Yes – we will build again. But next time, we will build a replica of an old building!
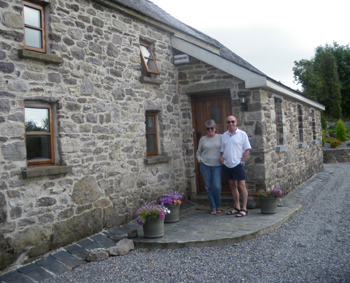
Proud owners of The Old Farm Cottage
Great post mate! Where
Wishing you and yours a very happy and prosperous new year !
[…] I visited the The old farm cottage, Kilkenny. I’ve also visited Kilkenny city by […]
Really lovely job. Would you recommend anyone near Dublin, I have a few problem with damp in my 1840s stone rubble cottage in bray. It’s the usual.. Modern building work done which doesn’t allow the house to breath I think so some damp patches on wall. Also I’d like to lay a new floor but am afraid of putting down wood or laminate in case it warps and tile are very cold underfoot. Any advice welcome. Sarah
Have a chat with a conservation architect – they should be able to point you in the right direction as they have more experience than anyone. A good structural engineer who is sympathetic to conservation would be excellent. I have been away from the building industry for a few years now so I’m really sorry that I wouldn’t be confident recommending anyone. Damp is one of the most frustrating issues with old cottages so it is worth your while getting reliable advice you can stand by before investing in improvements. Best of luck with it Sarah :-).